Sunday, 28 February 2010

I really had trouble making this card for the Mojo Monday sketch challenge. Not that the sketch was hard to follow but because I just couldn't find an image amongst my stamps that I felt was suited to it.

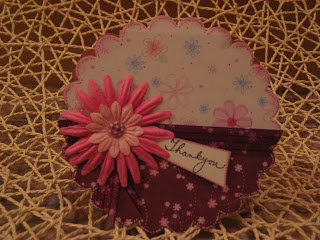
Then whilst shuffling through the papers in my drawer out fell a flower that I'd cut from class papers for a scrapbook page,rooting around some more I found the remaining offcuts. I love "Crate Paper" and had already used most of the offcuts on other cards .The collection was called Bliss and the papers I used here were "Impulse and Dreamy" I used my lovely new Martha Stewart punch on a strip of the paper which I laid under the ribbon and used 3 of the punched daisies from it showing the reverse of the paper down the right edge.I finished them off with some self adhesive stones by Papermania then stamped matted and layered the sentiment and glued it in place.Just goes to show that it's worth keeping all those off cuts!
Enjoy the rest of your Sunday,
Thanks for stopping by,
Julie x

Friday, 26 February 2010

Another little challenge

Found another nice sketch to follow for today's card,this one is the Friday Sketch Challenge.I'm really not sure who the paper is by but it was one of those that I just couldn't resist buying,have had it for a while but have never got around to using anything other than a thin strip which must have resulted in me removing it's name :(

Apart from the bright green of the cardstock all the paper was cut from the one double sided sheet,I love the trees and the paper that I haven't used here was in lovely strips of ribbons and leaves.Someone out there is bound to know who it's by! Even the lovely butterfly is cut from the same sheet.Have used my lovely Gorguss girl which I coloured using the copics and have borrowed a little idea that I saw the very talented Gayle use on one of her cards at the weekend of trimming the petals from prima flowers and using them in sections. Anyone who hasn't heard of Gayle Bond,you really must check her out at Scrapbook Sisters, she has even designed her own range of stamps. Well that's another card I can tick off my list for March, still more than a few to go!
Thanks for stopping by,
have a great weekend,
Julie x

Thursday, 25 February 2010

A Bit of a Challenge

Hi there,have been having a little play with the new stamp that I bought at Saturday's Crop,I think she's lovely,and like me she's always going to have a cup of coffee in her hand! She is by Sugar Nellie and the stamp is actually called "Coffee Time". I thought I'd team her up with the "cuppy cakes" paper by doodlebug design and follow last weekend's sketch by Sketch Saturday and also use this weeks colour combo of week 53 Copic Colour Challenge

The sentiment is one of my long lost stamps by Studio G and the gems I coloured with my Copics to match the colour scheme. The flowers were punched using the funky flower punch.What I fancy now is coffee and cake!
Hope you like this week's entry.
Thanks for stopping by,
Julie x

Sunday, 21 February 2010

After playing around with the Nestability die it made me look differently at some of my other dies.I've got a couple of sizzix frame dies and thought I'd have a go at using one of them to cut a small card.I folded the card and layed it as close to the edge of the the die as I possibly could so that when I ran it through my cuttlebug it cut along 3 sides and removed an aperture from the front and back of the card.

I then placed a piece of paper over the back of the card,filling in the space.The flowers around the frames were punched using 2 sizes of funky flower punches. I only cut parts of the flowers from the edges of the paper then placed them randomly around the frame using some holographic peel off dots for their centres. I stamped the girl,coloured her with my Copics and cut her out positioning her to the edge of the aperture on 3d pads. The greeting I stamped and layered onto toning card then positioned it attaching it on the inside of the aperture


I arranged the flowers around the frame at the back of the card leaving room to write my greeting in the centre. The card was an experiment but at least I know it works now. I will have a root around to see if I can use any other of my dies this way.
It's been a long first day back at work after the half term break,can't wait till Thursday when I'm off and will have time to play again! Have scrapbooking class Wednesday evening too so will have to sort out some photos,I wonder what papers we'll be using this week,can't wait to see.
Thanks for stopping by,
catch up soon,
Julie x

Had a lovely day at the Scrapbook Sisters crop today, was lucky enough to pick up a few tips from Gayle on shading using my lovely Copic Pens which by the way they have now started selling in the shop. Did a lot of chatting,catching up with people that I only ever get to see at the crop,also ate TOO much carrot cake! will have to run up and down the stairs a few times tomorrow to burn off all those scrummy calories.


Only ended up making 4 cards today,Wendy who I sat next to had a lovely selection of Nestability dies which she let me have a little play with. I cut the flower out for this card using one of them,that's the great thing about the crops, sharing craft items along with skills. Thanks to my S.I.L. who came to tea this evening and spent ages searching the Internet, I too will soon have this set of dies, I can't wait, I thought it worked well with my little Gorguss girl, just added a couple of leaves cut with a sizzix die and Bobs your Uncle! I also treated myself to the" Coffee Time" stamp by Sugar Nellie,she will look fab with a flower I'm sure.They had some lovely new Sugar Nellie stamps in the shop but unfortunately I was so busy chatting that I missed out,hope they will soon be back in stock,I have my eye on a couple more. Must also say thanks to Helen for spending the evening organising my stamps for me,I didn't realise I had so many,now that they are all in the same place instead of spread around in drawers and tote bags I might remember to use some that I'd forgotten I'd got.
Enjoy what's left of the weekend,
thanks for stopping by,
Julie x

Friday, 19 February 2010

Basic Grey Challenge

Another birthday coming up on the calender this time it's my daughter's best friend who's turning 18,how time flies. I thought I'd tie this in with the Basic Grey challenge seeing as how I was using their papers anyway. I believe this is coming to an end today too.


The Sketch which I followed was lovely,I followed the basic idea but instead of using a stamped image I punched out the 18 using my Sizzix Alpha Bubble dies, I cut the BEX out twice,once in red card stock and once in white,I then run a thin line of glue around the red and placed it on to the white leaving a slight shadow of the white showing.I then used the same technique with the scrolls in the top corner which I punched out using a Quickutz Revolution die,part of it anyway.I tied the ribbon around the centre segment but had problems getting the bow to lay right so I ended up taking a piece of ribbon,tying a knot in it and attaching it so the knot was where I wanted my bow to sit.I then made the bow and glued it onto the knot,much easier!I mounted the centre onto 3d pads and placed it into position.I hope that Bex likes it.

I probably won't be making any cards today,I need to sort out what stash I will be taking with me to the Scrapbook Sisters crop tomorrow,I usually take everything but the kitchen sink but for once I'd like to go organised enough to be able to make the long list of cards that are needed over the next couple of months.I'm really looking forward to, catching up with all my crafty mates over a coffee and the carrot cake that is always supplied. Hope you have a lovely Friday,

thanks for stopping by,

Julie x

Thursday, 18 February 2010

What a horrible rainy Thursday we're having today,unfortunatly I think the light has affected the way the colours appear in the photo of todays card.In real life the little girls dress tones beautifully almost matching the spotty banner of paper.I should have checked who the papers are by before I stuck down all the elements of my card as I think that they appear on the hidden edge strip.I think it's basic grey but am really not certain.I followed this weeks card sketch by Mojo Monday reversing the sides of the layout.I also followed this weeks colours of the Copics challenge the colours were the pale pink of the hair ribbon the grey of the shoes and the green that I used for the flower stem and also to colour the gem that I used for the flower centre.
I'm hoping that tomorrow is a brighter day and then I will replace this photo hopefully with one that does the colours justice.

The stamped image is another of the three girls in the set of Woodware clear stamps called Mary and friends. Fingers crossed for a little sunshine tomorrow,hope to see you then,

Julie x

Wednesday, 17 February 2010

Monochromatic Men

I don't know about you but I struggle when it comes to making cards for men,little boy's cards aren't quite so hard but unless the man has a hobby that you can incorporate into the design it can get rather hard to come up with ideas. Unfortunately I've got a run on male birthday's coming up over the next few weeks so had to come up with something quick. I woke up this morning remembering a sheet of paper that I bought at Scrapbook Sisters sale a few weeks ago.Not entirely sure who it's by but it could be Papermania as I have a set of clear script stamps that seem to match it. I cut the black bazzil a fraction smaller than my card blank and the paper a fraction smaller again then layered them together using glue only around the edges of the layers to allow for removing individual layers later on if necessary. Next I layed the open card onto the cutting mat of my Cuttlebug laying a Nestability circle die on top where I wanted the aperture to be. I had to run the card through several times,lifting the die and removing a layer at a time. It's quite easy to do this as you can feel when the die is in the correct place once you've removed a layer.With a bit of playing around with the different sized dies I was able to cut a thin frame of black to fit back over the front around the aperture. I stamped the letters for Brother onto a scrap of photo paper using a Black Brilliance ink pad.I then cut them out and and stuck them onto a thin strip of card across the aperture.


The stars were cut out from silver card using various cutters then glued onto black card and trimmed around leaving a thin edge of black showing. I used black card stock inside the card and lined up a silver circle of card so that when the card is shut it fits exactly behind the aperture. I will write my message on the back of this card.


After coming up with this design,the next one was easy,I might cut out and put together another one ready to finish off for another easy card for a man.This time I used my lovely new sizzix alphabet dies that I got as a late Christmas present.
I gave this card a little more dimension by using 3d pads each side of the aperture to attach the banner.I first shaped the ends of the banner slightly so that I could glue the ends flat to the card.I've tried to show this in the photo but I don't think I've succeeded very well.

I really like this design,It will be an easy one to adapt I think I might use footballs instead of stars.
I hope that you've seen a little of today's lovely sunshine,it's certainly cheered up a very cold day.
thanks for stopping by,
Julie x

Monday, 15 February 2010

Sketch Saturday

I know that it is Monday and not Saturday but I thought that I'd have a go at following a sketch.Have followed scrapbook sketches in class but have never used sketches in my card making before.I followed "Sketch Saturday's" example, It was so easy to do and I'm rather pleased with the result.

Inspired by the lovely card made by Karen on Scrapbook Sisters blog yesterday,I decided to use fresh citrus shades. The papers are "Bo Bunny mint dot and buttercup dot".The cute little image and text are from a set by Woodware that I bought last year.I am really pleased with the results I got using my lovely Copics,especially the little pussy cat,I'm beginning to get the hang of shading with them now. I couldn't work out what to use as the centre for the flower but I had a little experiment and discovered that if you use two shades of copics on the petals and then use the colorless blender in the centre of the flower and again on the edges of the petals that the colours bleed together giving a tye dye effect,I then rolled the flower up and pushed it through the centre of another bloom,I think it looks a bit like a mini daffodil I will try and enter my attempt but am not very hot on this computer lark.
Hope you like my first attempt.
Thanks for stopping by,
Julie x

Sunday, 14 February 2010

Today's card is made using the "Celebration Cupcakes" paper again but this time I used a square "Cuttlebug stamp" punch to cut out the individual cakes. I mounted them onto some of the green from the Celebration papers from last weeks class,added drawn stitching and mounted them onto the most scrummy "Bo Bunny buttercup dot" paper which has a lovely shade of yellow on it's reverse.I used a light brown chalk eye around the edges of the paper,wrapped the green check ribbon around the card then mounted onto my card blank.This time I cut my A4 card in half lengthwise to make the card blank. I folded it in half so that the fold was at the top of the finished design.


I stamped the bear with my magazine freebie,coloured him using copic markers and added a greeting to his crown.I used my craft knife to cut a slit along the bears hand and slipped a cupcake cut from the paper behind it. I shaped the bear and mounted him onto the card using 3d pads.The flower was punched using the small funky flower from coordinating paper and topped with a button.Glaze was added to the heart and cherries to give dimension.
Hope you like today's card,
Happy Valentine's Day,
Julie x

Saturday, 13 February 2010

This is another card using papers left over from this week's scrapbooking class.The paper is the "Celebration Dotted stripe" the punched circles are from coordinating papers from the same range.
To make the card I first mounted the paper onto a thin piece of card a fraction smaller than my card blank,this was to reinforce the paper,making it strong enough to thread the elastic through.


I punched out the three coordinating circles and punched a hole in the centre of each.Working out the height I wanted my elastic to go I punched two small holes at either side of the card,tied a loose knot in one end ot the elastic,pushed the elastic in and out of the holes on one side then threaded the three circles onto the elastic.I then threaded the elastic in and out at the other side of the card pulling it taught and tying another loose knot on the front of the card.I positioned the circles using a small dot of glue to keep each in place.I then glued this to the card blank,added the greeting and doodled using my trusty white gel pen.
Hope you like it,
Julie x


Friday, 12 February 2010

I've used 2 of the papers that I had left over from this weeks class to make tonight's little card.First I covered the front of my card using green bazzil I then cut a piece of the "Celebration Green Mini Dot" paper just a fraction smaller than the green.I punched a scalloped circle from the top corner of the paper,turned the cut out over and attached it to the inside of the aperture at the bottom,this shows the reverse of the paper which is blue.

I doodled onto the paper using a white gel pen,attached the paper to the bazzil and wrapped ribbon around the front.I then attached this to the card blank adding a greeting to the ribbon.The cupcakes were cut from the "Celebration Cupcakes paper and shaped using the edge of my boning knife.I ran a small thread of glue to 2 of the cup cakes but only on the cake case so that when stuck to the card they still hold a little of the shaping. The centre cupcake was mounted using 3d pads.


I put 3d glaze on the cherry and the heart and used "stickles" on and behind the flame of the candle.


I cut a square of green bazzil for the inside of the card, removed a fluted circle from the centre and replaced it with a circle of sparkly white paper which I brushed round with a chalk eye.I put the inside together adding a cupcake.
I hope you like this little card.Have a great weekend,
thanks for dropping by
Julie x

Thursday, 11 February 2010

I promise that this will be the last of the Pink Parfait cards for the time being but this was the other card made using the offcuts from last night's post card.I added to this one of the Gorguss girl images which I stamped using a black Brilliance pigment ink pad and coloured using my Copic pens I then added highlights with a white gel pen.


I cut out and slightly shaped the image over the edge of my scoring tool then put 3d pads through just the centre of the body and tipped the edges of the image with glue.I like to do this as I think she looks Gorguss this way.


Hope the photo explains this better than I can.


Last night was the evening that I attend my fortnightly scrapbooking class at Scrapbook Sisters.Thought I'd share with you my interpretation of one of this week's projects.

Thanks for stopping by,


Julie x


Wednesday, 10 February 2010

Just a quick post as I'm off to my Scrapbook class tonight.This is the card as promised that lead to last nights posting.The Tiara sitting on the 0 was cut using a sizzix die,the papers etc are all the same as last night posting.


Happy Birthday Jo!! thanks for dropping by,
Julie x


Tuesday, 9 February 2010

I don't know about you but I usually find that It can take ages to make a special card for someone,then I start clearing my stash away and suddenly out of the off cuts appears another card crying out to be made.Will save the special card to post tomorrow as that's when my friend's birthday is but here is one of the cards that I made from the off cuts.


The scrolls were cut using a Quickutz Revolution die,from some amazingly bright pink foil card that has been in the drawer for years.The spotty "Bubble Gum" pink paper is by Doodlebug and the off cut is yet again from the Pink Parfait paper pack. The Prima flowers tone beautifully.I usually use buttons for the flower centres but as my friend likes all things bling and I'd used them on her card I thought I'd do the same on this one.The greeting is "Jane's Script".
Will post Jo's card soon but just in case she drops by my blog,Have a Happy 40th Birthday tomorrow x
See you soon,Julie x

Sunday, 7 February 2010

Another little card


Wasn't going to do any crafting today but took a quick look at the calendar and noticed that it's our friends' Anniversary at the beginning of next week so thought I'd make another of my favourite little cards.


Must remember in the future though that cards are best photographed in natural daylight as the colours aren't entirely true.Have posted two photos taken in different rooms so hopefully you'll be able to get the gist.


I've used two different off cuts of paper to cover the front of the card but before I've stuck them onto the base card I have joined them and added a thin strip of paper in a deeper toning shade.I then wrapped a piece of tulle around this then wrapped the daisy lace over the tulle glueing at the back of the card.The hearts were cut out in both of the paler papers using a sizzix die and then put back together so that each heart is of both papers.I brushed around all of the edges with a toning chalk eye and then glued thepapers to the card base.The heart and the greeting were mounted onto the card using 3d pads.I used a white gel pen roughly around the edges and couple of gems gave the finishing touch.


Hope you like it, Julie x

Friday, 5 February 2010

A little stamping


This card was made using yet again the forever friend Pink Parfait papers.I stamped onto one of the papers using a flower from Gayle Bonds "Flowers and Fauna" stamp collection which are only available at Scrapbook Sisters. I cut the circles using Revolution Nesting circles and Nestabilities Scalloped circles dies in my Cuttlebug and stamped the Happy Birthday using Papermania's Sentiment clear stamps.I like this one cut free hand and shaped into a wave as it works well with the line of the text.I used 3d pads under some parts of the text and glued some areas flat. I'm so glad it's Friday might get the chance to play!
Thanks for visiting,Julie x

Thursday, 4 February 2010

I like making these little notelet cards,using my Cuttlebug and Nestabilities Dies.They are so quick and easy to make and use up any off cuts.


Made this one as a virtual thankyou for Julie at Scrapbook Sisters for the blog help that she gave me earlier today.


The other quick card I made today was this one. The paper was again from the A5 Pink Parfait paper pack and the embossed flowers in the middle were made using one of the new range of embossing folders available from Scrapbook Sisters.Not sure of the make but they go through the Cuttlebug beautifully


The text was stamped using the Jane's Script clear stamps by Woodware.

Wednesday, 3 February 2010

Wednesday 3rd February

I was never going to scrapbook but in June 2005 a new shop opened near to where I live and I thought I'd pop in to have a nose around.I filled out a form and a few weeks later received a letter asking if I'd like to have a free scrapbook lesson.Five and a half years later I'm still attending lessons once a fortnight and have made lots of lovely crafty friends.Cardmaking is still my passion but scrapbooking has added a new dimention to my crafting. Thankyou Scrapbook Sisters !

Here are a couple of my recently completed class projects

It doesn't show in the photograph but this page is actually done on acetate with the pink card stock behind it.The flowers were stamped onto papers and then cut out.The butterfly looks much nicer than photographed, it's stamped onto paper and acetate then shaped and layered.Thankyou Karen and Julie for this lovely project

It's very rare for me to do scrapbooking other than in class but I so loved this photo of my lovely family that it just had to be done.I doodled around the edges of the bazzil and on the arrows to compliment the doodley flowers on the papers and was very brave and cut the background away from the photo.Was pleased with the effect.

Tuesday, 2 February 2010

Tuesday 2nd February 2010

The 3 cards today I made using a freebie stamp that I got with a magazine last year.I know that it's a bit late for the New Year card but hey ho, it was on my camera so thought I'd post it anyway. Am a bit back to front by showing the inside of the card first but took me a while to work out what I was doing.Hopefully this is a learning curb and I'll get it right next time. The papers and everything else that I used in the cards came from Scrapbook Sisters,love the new Pink Parfait forever friends papers that I used on the first card,The colours are so usable.

The bear was so lovely to colour,could play for hours if I had any to spare.


The Happy Birthday was self adhesive chipboard lettering which I rubbed over with an emery board and then rubbed over with a chalk eye,I love the distressed look that it gave.


Hope you like them,Julie x


Monday, 1 February 2010

Monday 1st February 2010


I'm new to this game so am having my first blog lesson.These are just a couple of cards I made a while ago, just to get me started on this blogging lark.